A leaky faucet can be more than just an annoying drip—it’s also a waste of water, money, and can lead to more severe plumbing issues if left untreated. Fortunately, how to fix a leaky faucet is a question that’s easier to answer than many people think. Whether you’re dealing with a kitchen sink, bathroom sink, or bathtub, this guide will provide all the steps you need to tackle various types of faucet leaks, including how to fix a leaky faucet with two handles, how to fix a leaky faucet single handle, and more.
Before diving into the “how-to,” it’s helpful to understand why faucets leak in the first place. Faucets are mechanical devices, and like any mechanical part, wear and tear over time can cause seals, washers, or cartridges to fail. Common causes include:
Worn-out washers or O-rings
Corroded valve seats
Loose or damaged handles
Worn cartridges in single-handle faucets
Understanding the root cause of the leak helps in determining how to fix a leaky faucet handle or spout efficiently.
Tools You’ll Need
No matter which type of faucet you’re dealing with, you’ll typically need these tools:
Adjustable wrench
Flat-head and Phillips screwdriver
Allen wrench (for some models)
Replacement washers, O-rings, or cartridges
Plumber’s grease
Towel or rag
Bucket (for water spills)
You might find helpful visuals by searching YouTube how to fix a leaky faucet, which offers countless tutorials if you prefer video guidance.
Step-by-Step: How to Fix a Leaky Faucet
1. Turn Off the Water Supply
Before starting, always turn off the water supply to the faucet. Look under the sink for the shut-off valves or turn off the main water line if necessary.
How to Fix a Leaky Faucet With Two Handles
Two-handle faucets are common in older homes and typically have separate handles for hot and cold water. Here’s how to fix a leaky faucet with two handles:
Steps:
Determine which handle is leaking—hot or cold.
Remove the decorative cap and unscrew the handle.
Use a wrench to remove the packing nut and take out the stem.
Inspect the washer and O-ring—these are often the culprits.
Replace the worn parts and reassemble.
Turn the water back on and test.
Knowing how to fix a leaky faucet handle bathroom for two-handle systems saves time and money, especially when the leak is minor.
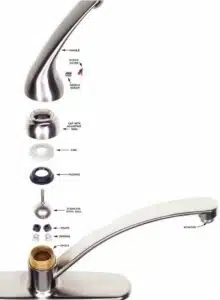
How to Fix a Leaky Faucet Single Handle
Single-handle faucets are more modern and operate via a cartridge, ball, or disk mechanism. Here’s how to fix a leaky faucet single handle:
Steps:
Turn off water and plug the sink drain.
Remove the handle—usually via a set screw.
Take out the cartridge or ball mechanism.
Inspect and replace seals, springs, or the cartridge.
Apply plumber’s grease and reassemble.
Test for leaks.
You can find visual guides by searching how to fix a leaky faucet YouTube, especially for tricky single-handle models.
How to Fix a Leaky Faucet Handle
Sometimes the leak originates from the handle itself. Here’s how to fix a leaky faucet handle:
Steps:
Remove the handle and check for loose screws or worn O-rings.
Replace any damaged parts.
Apply plumber’s grease.
Reassemble and test.
Whether you’re fixing a leaky faucet handle bathroom or kitchen, the steps are generally the same.
How to Fix a Leaky Faucet in the Bathtub
Bathtub faucets can leak and waste gallons of water daily. Here’s how to fix a leaky faucet in the bathtub:
Steps:
Shut off water at the main valve.
Remove the spout and handles.
Replace worn washers or cartridges.
Reassemble and test.
Learning how to fix a leaky faucet bathtub is especially important in older homes with traditional tub fixtures.
How to Fix a Leaky Faucet Outside
Outdoor faucets, also known as hose bibbs, can leak due to weather exposure.
Steps:
Turn off water from the inside shut-off valve.
Remove the handle and stem.
Replace washers and O-rings.
Use plumber’s tape on threads.
Reassemble and test.
For gardeners and homeowners, knowing how to fix a leaky faucet outside can prevent water loss and foundation issues.
Pro Tips for All Faucet Repairs
Always bring the old part to the hardware store to ensure an exact match.
Don’t overtighten parts—it can cause damage.
If uncertain, search “YouTube how to fix a leaky faucet” for tutorials specific to your faucet brand.
When to Call a Plumber
While many leaks can be repaired DIY-style, consider calling a professional if:
You can’t identify the leak source.
The leak persists after multiple attempts.
You notice water damage around fixtures.
Preventing Future Leaks
Regularly check handles and spouts for drips.
Replace washers/O-rings every few years.
Avoid excessive force when turning handles.
Knowing how to fix a leaky faucet with one handle or two ensures you’re prepared, but preventing leaks is always better.
Conclusion
From the bathroom to the backyard, understanding how to fix a leaky faucet is a valuable skill that can save you hundreds of dollars annually. Whether you’re addressing how to fix a leaky faucet with two handles, a leaky faucet in the bathtub, or even figuring out how to fix a leaky faucet outside, the steps are manageable with the right tools and a little patience.
For added support, never hesitate to consult how to fix a leaky faucet YouTube tutorials or reach out to a professional. Mastering how to fix a leaky faucet handle bathroom fixtures or how to fix a leaky faucet with one handle can be a rewarding DIY accomplishment.
Let the drip stop today—and your water bill thank you tomorrow.